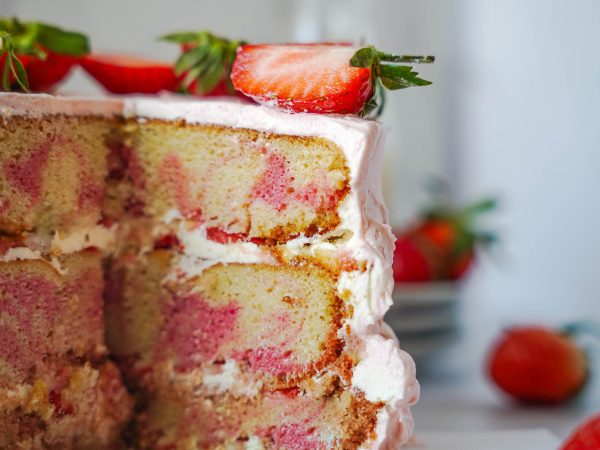
WhiskMeFree’s Vegan Strawberry Cake
Influencer / Bakes and Sweet Treats
Ingredients
INGREDIENTS FOR THE SPONGE
- 240g plant-based milk
- 1 tsp apple cider vinegar
- 60g olive oil
- 210g gluten free flour
- 1 tsp xanthan gum
- 1/2 tsp baking powder
- 1/2 tsp bicarbonate of soda
- 200g maple sugar
- 1 tsp strawberry extract
- 1 tsp pink food gel
- 1 tsp vanilla
INGREDIENTS FOR THE BUTTERCREAM
- 150g vegan butter
- 325g icing sugar
- 2 tbsp strawberry jam
- Pink food gel
Method
FOR THE CAKE
- Begin by making your ‘buttermilk’ by combining your plant-based milk and vinegar together. Set aside for 5 mins while you mix together the dry ingredients.
- Combine all the dry ingredients together into a separate bowl.
- Then add the vanilla and oil into the ‘buttermilk’ mixture.
- Once combined, pour the ‘buttermilk’ mixture into the dry ingredients and mix until combined.
- Transfer 1/2 the batter into a separate bowl and add your strawberry extract and pink food gel. Mix that through, being careful not to over mix.
- Transfer 1/4 of the vanilla batter to the pan then add 1/4 of the pink batter on top. Add the 2 batters alternatively to each pan, whilst evenly distributing the batter.
- You should now have created a marble effect with the alternative batters. Bake the cakes for 1hr or until a skewer comes out clean when inserted or the cake is springy to the touch.
FOR THE STRAWBERRY BUTTERCREAM
- As the cake cools, begin by making the vegan buttercream by creaming together the vegan butter and sugar until pale and fluffy. Then add a few drops of pink dye and strawberry jam. Mix until fully incorporated.
LAYERING THE CAKE
- Before layering make sure all the sponges are level. If they’re not, use a serrated knife or cake leveller to remove any unevenness.
- Once levelled, spread on a large spoonful of the buttercream onto the first layer and place the sliced strawberries on top.
- Continue this with the next layer. Place the third layer on top of the buttercream filling face down – this will help create a neat iced cake.
- With your spatula spread more of the buttercream along the sides of the cake, making sure nothing is left bare, continue to ice moving your way up to the top of the cake.
- From here you can decide whether to make a rustic cake or a neat/more professional looking cake. If you want to opt for the former you will need to do a crumb coat and then a second layer of icing across the whole of the cake.
- Then with a cake scraper go around the cake again to smooth the icing out. For a more rustic look, create a few dips and flicks in your buttercream- no need to smooth it out.
- To finish, top with a few sliced strawberries to create a border.
- Slice and enjoy!
If you like the look of this beautiful, layered vegan cake, then take a look at more of WhiskMeFree’s recipes over on their blog.
The Quebec Maple Syrup Producers are not in any way responsible for the identification or presence of allergens in recipes or for the classification of any recipe as vegetarian or vegan.
Hundreds of Delicious Recipes
Maple is a special addition to any recipe, from starters and snacks to sumptuous desserts. Find one that’s perfect for you, your family and friends.