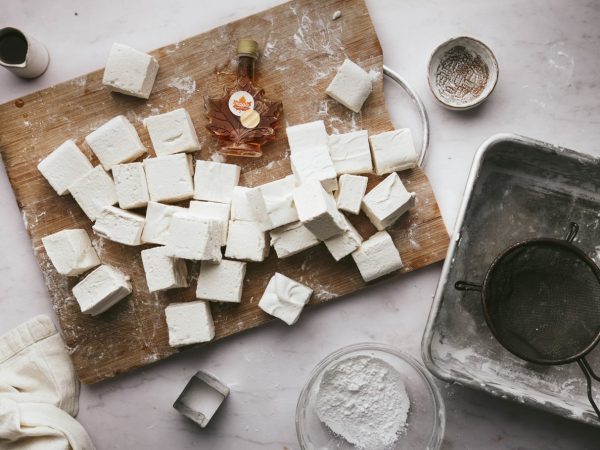
A Cup of Tea and Cake’s Maple Marshmallows
Desserts / Bakes and Sweet Treats / Influencer / Snacks / Winter
Ingredients
Ingredients
- 333 ml warm water + an additional 167ml to soak the gelatin
- 36 g powdered gelatin
- 500 g maple sugar
- 320 ml corn syrup
- 1 vanilla bean, split and seeds scraped out
- 2 tbsp pure maple syrup (preferably golden colour for its delicate flavour)
Equipment
- Sugar thermometer
- Dough scraper
- 9 x 13 inch high-sided tin
- Large metal bowl
- Heavy duty / cast iron saucepan
- Oven gloves
- Electric whisk or heavy duty stand mixer
- Chef’s knife
- Sieve
Method
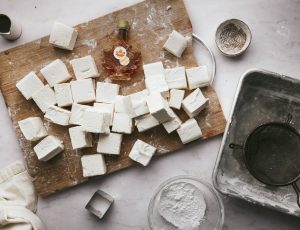
- Prepare by splitting and scraping the vanilla bean, then grease the 9 x 13 inch baking tin with salted butter.
- Sift the cornflour in a small bowl to remove lumps. Sprinkle about half of the cornflour into the buttered tin, coating the bottom and sides evenly. Tap out the excess by turning the tin upside down over a bin or sink. A generous coating is needed to prevent sticking.
- Butter your dough scraper or rubber spatula and set aside.
- Pour 167 ml water and all the gelatin into a metal bowl. Stir so the water is absorbed evenly by the gelatin, then set it aside. The gelatin will set like jelly but will be melted later with the hot sugar syrup.
- Attach your sugar thermometer to a heavy-bottomed saucepan, ensuring it does not touch the pan’s bottom. Over medium-low heat, melt the maple sugar, 333 ml water, and corn syrup until the mixture reaches a low steady simmer. Do not stir – let it bubble gently until it reaches 240 °F (soft-ball stage), about 10-15 minutes. Adjust heat slowly if needed.
- Carefully whisk the gelatin to break it up, then add the scraped vanilla bean and pure maple syrup. Use oven gloves for safety. Remove the sugar syrup from heat. (You can get help tipping the gelatin bowl at a 45-degree angle safely).
- Slowly pour the hot sugar syrup into the bowl with the gelatin mixture in a steady stream, avoiding splashes by pouring against the bowl’s side.
- Turn on the electric whisk to its lowest speed, whisking carefully from a distance to avoid splashes. Whisk for one minute then gradually increase the speed.
- Whip for approximately 8-10 minutes until the mixture turns white, thick, and glossy – similar to marshmallow fluff but stickier. Continue whisking if the bowl’s outside still feels warm.
- Quickly scrape the sticky marshmallow mixture into the prepared tin using the buttered scraper or spatula. Work fast as it sets quickly. Smooth the top evenly.
- Allow to set for about 4 hours, or cover with cling film if setting overnight.
- Before cutting, sprinkle the remaining cornflour evenly over the set marshmallows.
Use a sharp knife to loosen the edges and invert the marshmallows onto a chopping board. You may need to use your fingers to free them from the tin as they will be flexible.
of your tin.- Measure and mark small incision guides, then cut into large squares with a sharp, buttered chef’s knife to prevent sticking.
- Store marshmallows in an airtight container for up to one month.
Making homemade marshmallows might seem like a lot of effort, but if you’ve never tried it, you’re missing out. They’re fluffier, more delicious and toast up a treat. Plus, they’re ideal for gifting at this time of year – and with this recipe yielding around 36-40 marshmallows, there are endless possibilities.
This marshmallows recipe is crammed with caramel-y maple sugar and pure maple syrup for a delicately sweet flavour that can’t be beaten at Christmas. Remember to read the full recipe from beginning to end before starting, and take safety seriously when working with hot sugar and corn syrup.
If you like the look of this marshmallows recipe, make sure to check out A Cup of Tea and Cake’s blog for more great baking inspiration.
The Quebec Maple Syrup Producers are not in any way responsible for the identification or presence of allergens in recipes or for the classification of any recipe as vegetarian or vegan.


Hundreds of Delicious Recipes
Maple is a special addition to any recipe, from starters and snacks to sumptuous desserts. Find one that’s perfect for you, your family and friends.